Distal biceps- Volar Single Incision
See Distal biceps tendon rupture treatment options for overview.
Several authors have described slightly different approaches and methods of fixation.
-
Galatz 2002; suture anchor.
-
Drosdowech 2002; suture anchor.
-
Bain 2002; endobutton.
-
Mazocca 2005; endobutton and interference screw.
| Galatz; suture anchor. | Drosdowech; suture anchor. | Bain; endobutton. |
Mazocca; endobutton and interference screw. |
|
|
|
|
|
Indication
Acute distal biceps rupture
Anatomy
Considerations
Biomechanical study of tendon reattachment compared transosseous sutures to two different anchor devices.
In all cases, transosseous sutures showed greater ultimate pullout strength than did either anchor device.
Thus, implant failure remains a potential complication.
Another concern is that tendon healing to the radial tuberosity may be less complete than healing that occurs when the tendon is buried inside a hole in the bone.
Thus, late failures might possibly
occur.
Deirmengian et al reviewed the literature 2006, the data available shows good to excellent results with both, 2-incision modified Boyd-Anderson approach with transosseus suture fixation and 1-incision anterior approach with alternative fixation methods.
To see 2 incision technique with transosseous fixation.
Positioning
Supine, arm board.
Tourniquet, milk biceps down and place tourniquet as high up arm as possible.
Consider sterile tourniquet.
What is often not emphasized in descriptions of either the one- or two-incision techniques is the difficulty in attaining exposure of the operative site while at the same time maintaining correct forearm and elbow position. The surgeon may need one or two dedicated assistants to carry out these procedures successfully.
Galatz suture anchor
Skin Incision
Henrys approach is using an S-shaped incision with the transverse limb centred on the antecubital fossa.
This potentially allows exposure of the distal biceps tendon in its proximally retracted position.
However, it is often possible to simply use the distal-most portion of this incision.
The biceps tendon can be milked down into the wound and grasped proximally with an Allis forceps.
The distal incision is made just medial to the mobile wad.
Superficial dissection
The lateral antebrachial cutaneous nerve is identified, preserved, and retracted laterally.
Deep dissection
Brachioradialis is retracted
laterally, and the pronator retracted medially.
The tendon is usually
easily located as the cubital bursa is
opened.
The tract of the biceps tendon often is filled with haematoma and thin, serous fluid.
Use an Allis clamp underneath the proximal skin flap to retrieve the retracted biceps tendon.
Place a stay-suture through the tendon.
Gently release adhesions surrounding the tendon.
Debride the end of the tendon of haematoma and scar tissue.
Fully supinated the forearm, and expose the radial tuberosity.
The posterior interosseous nerve is the structure at greatest risk, supination helps to protect the posterior interosseous nerve by moving the nerve further from the field.
Dissection is kept to a minimum and is never carried to the periosteum of the ulna, to lessen the risk of heterotopic ossification and subsequent radioulnar synostosis.
The radial attachment of the supinator is left intact. The radial nerve and posterior interosseous nerves are rarely fully exposed, and care is taken during retraction not to injure them.
The radial recurrent vessels are identified and preserved when possible, on rare occasions they need to be ligated.
Debride any soft tissue on the bone,
but do not decorticate before anchor insertion.
Two Mitek G-4 suture anchors with attached no. 2 Ethibond
(Consider loading anchor with fibrewire or similar) sutures are placed
into the tuberosity.
Place the anchors as medially as possible on the supinated tuberosity to recreate the normal insertion point of the distal biceps tendon.
Often during anchor insertion the suture is damaged at the point where the anchor insertion device contacts the edge of the drill hole.
To minimize the consequences of this potential suture weakening, slide the suture through the anchor so that contact occurs at the distal end of the suture.
Thus, when the suture is slid back
through the anchor, this potentially weakened portion of the suture will not
be involved in the repair (alternatively use fibrewire/
stronger suture).
Advance the distal biceps tendon toward the radial tuberosity.
Place a Krackow stitch along the edges of the tendon with one limb of each suture in the two anchors.
The two proximal ends are tied to each other. The distal biceps tendon is reduced to the radial tuberosity by pulling tension on the free, distal arms of the sutures.
The distal ends are tied to each
other with the arm in 90° of flexion and full supination.
Post operatively
Backslab, 90° elbow flexion with the forearm in supination.
7 to 10 days after surgery, remove backslab, examine wound, place arm in sling.
Passive elbow flexion and active assisted extension exercises.
At 6 weeks, remove the sling and allow full active range of motion no resistance.
Supination and flexion strengthening is begun at 12 weeks.
Complications
Few complications have been reported using this technique of limited direct repair using suture anchors.
Before the introduction of suture anchors, the sutures that passed through the radial tuberosity were tied on the posterior aspect of the radius, risking significant injury to the posterior interosseous nerve.
The lateral antebrachial cutaneous nerve is potentially at risk at the time of incision and exposure, and care should be taken to identify and retract it in the superficial dissection.
Other potential complications include anterior elbow pain, loss of motion, heterotopic ossification, and repair failure.
Radioulnar synostosis has not been reported using this technique.
Drosdowech 1 incision and suture anchor
Skin incision
Transverse from medial to lateral
over the elbow flexion crease and extend distally, following the
medial aspect of brachioradialis.
Superficial dissection
Identify, retract laterally and preserve the lateral cutaneous nerve of the forearm.
Deep dissection
Identify the tract formerly occupied by biceps between brachioradialis and pronator teres.
In acute ruptures, a finger can readily palpate along the tract of the biceps tendon down to the bicipital tuberosity when the forearm is held in supination.
Avoid sharp Homan-type retractors, which may place the posterior interosseous nerve at risk because it travels around the proximal radius.
In general, the radial nerve does not need to be explored.
Rest the more ulnar-sided retractor against the radial artery and median nerve.
The distal biceps tendon can be found just proximal to the transverse incision.
While elevating the upper half of this incision with a blunt retractor, gently sweep the tendon down into the wound while at the same time milking the biceps muscle from above.
In subacute ruptures, the incision should be extended proximally from the medial side of the elbow flexion crease, and the tendon may need to be dissected from the underlying brachialis.
The distal biceps tendon tract is typically
filled with scar tissue in cases of delayed surgery,
making exposure of the bicipital tuberosity more difficult.
Identify the recurrent radial artery overlying the
bicipital tuberosity and cauterize it using bipolar diathermy.
The distal biceps is almost universally tendinopathic and
should be debrided as much as 5 - 8 mm.
This often means leaving behind a small amount of
pathologic tendon to avoid excessive shortening.
Prepare the tuberosity for tendon apposition using a burr to create a cortical facet to a length that allows for the distal biceps tendon to be docked.
Insert two Mitek G4 SuperAnchors at either end of the facet.
Maintain the forearm in full supination to ensure anchor placement as anatomically as possible on the ulnar portion of the tuberosity.
Take care not to perforate the opposite cortex.
Although a No. 2 nonabsorbable braided suture can be used, a No. 5 caliber suture may provide better strength (Consider loading anchor with fibrewire or similar).
Suture the biceps tendon with a reduction knot technique that allows for anatomic tendon apposition to bone.
Tie the sutures with the
elbow held at 60°flexion and full supination.
There should be some give within the biceps musculotendinous
unit to allow for further passive extension to
approximately 30° without evidence of gapping at the site of attachment.
Chronic ruptures may require repair in greater angles of flexion.
Closure
Allow the brachioradialis, pronator teres interval to fall together.
Deflate the tourniquet and secure haemostasis.
Standard wound closure.
Post operatively
Backslab, 90° elbow flexion and full supination for 1-2 days.
Physiotherapy - active assisted extension and supination and passive flexion and pronation.
As flexion increases beyond 90°, the reduced tension in the repair will permit unlimited pronation or supination.
Instruct patients not to extend beyond the angle that the tendon was felt to be tight intraoperatively, typically 30°.
Elbow extension is increased 10° per week until full extension is achieved.
Unlimited active range of motion at 6 weeks.
No formal strengthening until 3
months.
Complications
The most commonly described nerve injury is paraesthesia of the lateral antebrachial cutaneous nerve.
It is thought that this is due to a retraction injury, take great care in the method and degree of retraction needed for ideal exposure.
Heterotopic ossification can be minimized by avoiding subperiosteal exposure of the ulna and damage to the interosseous membrane during tendon passage.
Bone debris created by the use of a burr may also contribute to the formation of heterotopic bone.
This complication has been seen with the use of both one- and two-incision techniques.
Drosdowech et al routinely use Indomethacin 25 mg TID for 3 weeks postoperatively to control pain and swelling, and to limit the formation of potential heterotopic ossification.
There is no evidence in the literature demonstrating the efficacy of Indomethacin in preventing heterotopic ossification in patients after distal biceps repair.
Bain - Endobutton
Skin Incision
5-cm transverse incision, 2 cm distal to the elbow skin crease.
Superficial dissection
Identify and preserve the lateral cutaneous nerve of the forearm.
Deep dissection
Incise the deep fascia, identify the space previously occupied by the avulsed biceps tendon, an inflammatory bursa filled with haemoserous fluid.
Deliver retracted tendon into the wound.
Supinate and extend the elbow, exposing the radial tuberosity.
Use hand-held right-angle retractor (Langenbeck), instead of levers (hohman) to minimize the chance of injury to the adjacent neurovascular structures.
The
neurovascular structures are not formally explored in the
acute case, simply operate through the
tract previously occupied by the tendon.
Using a burr making a cortical window large enough to accommodate
the biceps tendon.
Stay as medial as possible, with
the arm held at
maximal supination, so that it reproduces the normal anatomic
position of the biceps insertion into the radial tuberosity.
Drill a 4.5-mm hole through
the anteromedial cortical window through the posterior cortex, maintaining an
adequate bridge of bone between the window and drill
hole.
Washout the wound to minimize heterotopic bone formation.
Debride the necrotic tendon end.
Use two number 5 Ethibond sutures to secure
the tendon to the two central holes of the Endobutton.
Place Bunnell sutures along the medial and lateral
aspects of the tendon, preserving the middle section to
maintain vascularity.
Commence the Bunnell suture proximally and advance it distally, through the holes of the Endobutton, before returning it proximally to tie it.
Leave a gap of 2 mm between the Endobutton and the tendon end to allow the Endobutton to be manipulated across the cortex of the radius.
Tie the sutures proximally
so that they are away from the Endobutton and do not
interfere with it locking into the radius.
Place the leading and trailing sutures into each of the two outer holes of the Endobutton,
use sutures of different colour (eg, Ethibond and Prolene) to help
track which suture is controlling which end of the Endobutton. These are used to manipulate the Endobutton
across the radius.
Advance a Beath straight-eyed needle through the hole in the radius, it is important to advance this needle directly posterior.
A cadaveric crosssectional anatomic study has demonstrated that there is a safe zone between 0° and 30°.
If the pin is advanced out as far as 45°, a posterior interosseous nerve injury can occur.
This needle delivers
the leading and trailing sutures that control and allow manipulation
of the Endobutton.
Only after placement of leading and trailing sutures flex and supinate the elbow.
Ensure the tendon is appropriately aligned, while pulling on the leading and trailing sutures to deliver the Endobutton to the dorsal aspect of the proximal radius.
Lock/ flip the endobutton by pulling on the trailing suture.
Use fluoroscopy to help passage of endobutton and confirm the position once locked into position. Remove the leading and trailing sutures.
Take the elbow through a full range of motion to ensure that the tendon is secure.
Closure
Standard closure
Post Operatively
Back-slab, 90° elbow flexion, forearm full supination for 1 week.
At 1 week remove back-slab provide a sling, with advice that it can be removed and the
elbow mobilized as tolerated.
No heavy lifting or grasping for 3 months
Not to perform any maximal flexion or supination of the forearm for 6 months.
Complications
On the anterior aspect of the elbow, the structure
most at risk is the ulnar
artery, which is on average 6 mm from the biceps tendon.
The distance from a Beath pin to the posterior interosseous
nerve is quite variable.
If the Beath pin is advanced in a posterolateral direction at 45°, then injury to the posterior interosseous nerve can occur. It is important when advancing the pin to advance it directly posterior, to minimize the chance of this complication.
The use of
hand-held right angle retractors is much less likely to
cause anterior neurovascular structure injury than use of
various levers. The use of
Hohmann retractors may lead to injury to anterior neurovascular
structures.
There is the potential to sustain a proximal radius
fracture.
It is important that the bony bridge between the anterior cortical window and posterior drill hole be
adequate to minimize the risk of fracture.
Irrigation of the wound and the minimally invasive technique reduce the risk of heterotopic ossification.
Mazzocca - Endobutton and interference screw
Skin Incision
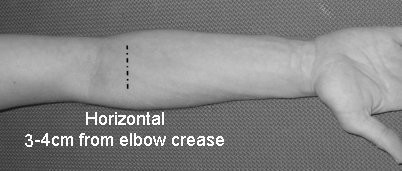 |
Transverse incision (better cosmesis) 3 - 4 cm distal to the skin crease at the antecubital fossa.
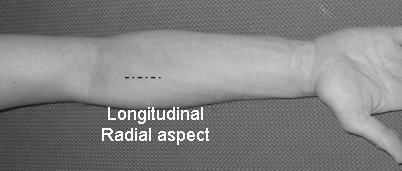
Longitudinal on the radial aspect of the volar forearm parallel to the muscular interval between brachioradialis and pronator teres muscles.
Use a modification of an anterior longitudinal Henry approach, with extension along the antecubital fossa if needed. |
 |
Superficial dissection
Avoid injury to the lateral antebrachial cutaneous nerve.
Deep dissection
Bluntly develop the interval between the pronator teres and brachioradialis to the level of the lacertus fibrosis and surrounding haematoma or scar.
Identify a series of veins (Leash of Henry) and the recurrent branch of the radial artery that must be addressed by suture ligature, coagulation, or retraction.
Tendon preparation.
Depending on the chronicity of the tear, the biceps tendon is usually retracted from the tuberosity and has a bulbous end. The tendon is measured and trimmed to an 8 mm thickness.
If the tendon end is frayed with degenerated
collagen, up to 1cm can be resected from the end without compromising the ability to
reattach it to the
tuberosity.
Two #2 fiberwire sutures
are then placed in the distal tendon (Krackow or whipstitch
fashion).
The first suture is started
12 mm proximal to the end of the tendon, travels distally,
then returns proximally after securing the endobutton
2–3 mm from the distal stump of the tendon.
The tails of this suture are cut. The second suture begins
distally, captures the endobutton, travels proximally 12
mm, and ends distally. One end of this suture
should be left long and the other short. The long ‘‘tail’’
will be placed through the cannulated portion of the
interference screw and will be tied to the short ‘‘tail’’
after insertion. The ‘‘Fiberwire’’ has a Kevlar core allowing it to have the
strength of a #5 non-absorbable braided suture but the
size of a #2.
This strength and durability is critical when
using the Arthrex Tenodesis driver, as the metal end can
damage and cut a standard braided suture.
The remaining outside 2 holes in the endobutton are
then loaded with 2 different color #2 fiberwire sutures. These will be used to pass
the endobutton
through the distal cortex.
Bicipital Tuberosity Preparation.
Supinate and extend the arm to adequately visualize the entire tuberosity.
It is possible for the tunnel to be placed too proximal if using the 2-incision approach and looking for the ridge.
Take care retracting the deep tissues for exposure do not retract too vigorously on the radial side of the proximal radius, as this may damage the posterior interosseous nerve.
Debride the tuberosity of any soft tissue, enabling complete visualization.
A Beath pin with an eyelet is placed into the centre of the tuberosity and drilled through both cortices. An 8 mm cannulated reamer is used to prepare an 8mm tunnel through the proximal cortex only.
A 4.5 cannulated reamer is then used to drill though the distal cortex.
Care must be used to not continue reaming after penetrating the cortex, as damage to the dorsal soft tissues may occur.
Washout all reamings
and bone fragments.
Placement of the Endobutton.
The 2 sutures placed onto the lateral holes of the endobutton (traction sutures) are then placed into the eyelet of the Beath pin. The arm is flexed, and the Beath pin is pushed through the soft tissue penetrating the dorsal skin. This pin is placed as ulnarly as possible to avoid damage to the neurovascular structures. One of the sutures is pulled until the endobutton passes the distal cortex; the second suture is then toggled, and the endobutton is deployed.
A portable radiographic image is
obtained (mini c-arm) to confirm that the endobutton
is deployed and that there is close apposition to bone.
Tenodesis.
The Tenodesis driver consists of a cannulated handle and post. Sutures from the end of the prepared tendon can be passed through the driver after the chosen screw has been placed onto the driver.
The post is used to insert the tendon to the bottom of the prepared socket and hold the tendon in place while the interference screw is advanced over it. To perform the tenodesis, one limb of the fiberwire suture is then placed through the tenodesis driver with the 8*12 mm screw attached.
The driver
is then inserted into the 8 mm hole, making sure that the
tendon is on the ulnar side of the tuberosity.
While the tendon is stabilized with an Addson forceps,
the screw is advanced via the tenodesis driver as described
above. After the screw is inserted
and the tenodesis driver is removed, the suture passing
through the cannulated screw is then tied to the outside
of the interference screw. Thus, there is both an interference
fit of the tendon to bone as well as a suture anchor
effect .
Three modes of fixation now exist (interference fit, endobutton, and suture anchor like fixation), which allows this method to have superior strength and cyclic load characteristics.
Closure
Washout the deep and superficial soft tissues.
Tourniquet down prior to closure.
Standard closure.
Post Operatively
Accelerated Rehabilitation
Full active-assisted range of motion immediately.
Encourage patient to achieve full extension/ flexion by the time the sutures are removed at 7–10 days.
This is followed by active range of
motion, with strengthening beginning at 12 weeks.
Traditional Rehabilitation
Backslab for wound healing and pain control.
Once the wound healed active assisted range of motion in neutral.
Active range of motion with the
weight of a coffee cup or less, first 6 weeks.
Range of motion and strengthening exercises are then advanced as tolerated.
Any pain producing activity is discouraged.
Allowing work and full activities between 3–6 months.
Complications
Potential complications include:
-
Infection
-
Superficial lateral antebrachial cutaneous nerve palsy
-
Fracture through the bone tunnel.
References
Personal observations
GALATZ LM, JANI
MM, YAMAGUCHI K; Single Anterior Incision Exposure for Distal Biceps Tendon
Repair; Techniques in Shoulder & Elbow Surgery 3(1):63–67, 2002
KELLY E W, O’DRISCOLL SW; Mini-Incision Technique for Acute Distal Biceps Tendon Repair; Techniques in Shoulder & Elbow Surgery 3(1):57–62, 2002
BAIN GI; Repair of
Distal Biceps Tendon Avulsion With the Endobutton Technique; Techniques in
Shoulder & Elbow Surgery 3(2):96–101, 2002
Mazzocca AD, Bicos J, Arciero RA, Romeo AA, Cohen MS,
Nicholson G; Repair of Distal Biceps Tendon Ruptures Using a Combined
Anatomic Interference Screw and Cortical Button; Techniques in Shoulder and
Elbow Surgery 6(2):108–115, 2005
DROSDOWECH
DS, FABER KJ, KING GJW; Distal Biceps Tendon Repair: One- and Two-Incision
Techniques; Techniques in Shoulder & Elbow Surgery 3(2):90–95, 2002
Deirmengian G, Beredjiklian PK, Getz C, Ramsey M, Bozentka DJ; Distal Biceps Tendon Repair: 1-Incision Versus 2-Incision Techniques. Techniques in Shoulder & Elbow Surgery. 7(1):61-71, March 2006