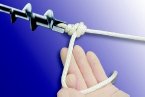
Arthroscopic knot tying
General knot tying principles
The knots
Non sliding knots
Revo knot
Square knot
Sliding knots
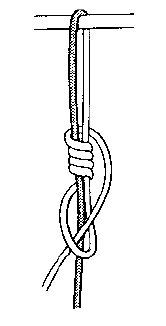
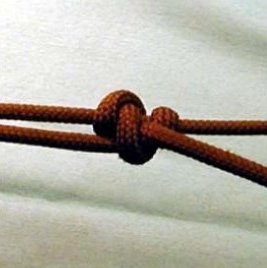
Duncan loop / hangmans loop - (non locking)
Nicky's knot
Field knot
Giant knot
SMC knot
Roeder knot
Weston knot
Taut-line
hitch
Buntline hitch
Tennessee slider
Terminology
-
Suture limbs - free ends of a suture available to be tied.
-
Turn - number of twists in a given throw.
-
Throw - specific step or layer of the knot.
-
Post (limb or strand) - suture limb around which you make a loop.
-
Wrapping or loop limb (or strand) - portion of the suture limb that one makes a loop around the post.
-
Slack -loose configuration of loop or compound loop, which slides in around the post.
-
Half-hitch knot - single turn around the post limb making a loop. It can be both used in sliding or nonsliding conditions.
-
Slipknot - formed by sliding the loop strand on the post strand.
-
Square throw- simple two throws, which makes a square knot, with each throw having one turn. When tying a square knot, the strands are pulled down in a line, perpendicular to the axis of the knot.
-
Reverse slippage (loop security) - knot loosening after placement of the slipknot or first throw half-hitch. Since the knot pusher must be removed to allow passing of further locking hitches, during this stage the slipknot or hitch tend to loosen slightly before final locking.
General Knot-tying Principles:
-
Have only one pair of sutures inside an operative cannula when knot tying, park the additional sutures through an accessory cannula outside the working portal.
-
Place the cannula tip as close as possible to the area being tied, to minimize soft tissue interposition and suture limb tangling.
-
Maintain tension in the first loop to prevent reverse slippage. Loop security is as important as knot security. Consider a self-locking knot.
-
Pass the knot pusher down one post of the suture through the cannula to make sure the posts (or limbs) of the suture are not tangled and are free of tissue ( consider using double hole knot pusher). Once the suture is untwisted as the pusher is withdrawn, get your assistant to place a finger between the parallel suture limbs. This keeps the suture limbs from re-twisting.
-
Ensure the suture slides freely.
-
Place a “single-hole” knot pusher on the post strand and a mosquito clip onto the end of the limb to “identify” it as the “post”. (Technique varies dependent on the type of knot pusher used). Pass the knot pusher down the cannula again to check the pusher is on the “post” and to double-check for any soft tissue or twists in the suture.
-
The tissues to be tied should be relaxed. Tension on the tissues can be decreased by internally or externally rotating, or abducting or adducting the shoulder to relax the tissues or place traction sutures.
-
Tie the knot and advance it into the joint. Each time the “post strand” is changed, place the knot pusher and mosquito clip on it, to identify the “new” post.
-
Every time the “post” is switched, run the knot pusher down the “new” post to check for twists or soft tissue. (This is an important step and can prevent complications with seating the half-hitch throws).
-
Never tie all loops of your knot around the same post. The best method is alternating post with reversing throws with more than three additional half hitches, regardless of the type of suture material.
-
Use a sliding knot whenever possible.
-
Use a suture anchor with good sliding capability, remember the anchor eyelet orientation.
-
The screw hole made for anchors should be funnel shaped
The knots
Knots can be divided into sliding and nonsliding.
Sliding knots can be further classified into:
-
Lockable - theoretically prevent reverse slippage and maintain loop security.
-
Nonlockable - require additional locking half-hitches.
In a simple knot, the first throw invariably slips when the knot pusher is withdrawn to place the second throw, locking knots prevent this.
Locking knots may be further divided
into: proximal locking, distal locking or middle locking.
Distal locking prevents knot slippage better than proximal locking, but is
difficult to lock when tension in the knot loop is high.
Proximal locking knots can easily be locked under the desired loop tension, but can also easily lose tension during additional locking half-hitches.
Middle-locking knots (SMC) prevents knot slippage maintaining loop security, like distal locking and can also easily be locked like proximal locking knots, even with high loop tension.
| Conditions | Knots | ||
| Nonsliding | Revo (Snyder knot) | ||
| Half hitch with post switch and reverse throws | |||
| Square knot | Arthroscopically difficult | ||
| Sliding | Non locking | Modified Duncan loop | |
| Modified hangman's loop | |||
| Locking | Nicky's knot | ||
| Field knot | |||
| Giant knot | Self locking | ||
| SMC knot | Self locking, middle | ||
| Roeder knot | Distal locking | ||
| Weston knot | Distal locking | ||
| Taut-line hitch | Proximal locking | ||
| Buntline hitch | Proximal locking | ||
| Tennessee slider |
Non sliding knots
Revo knot
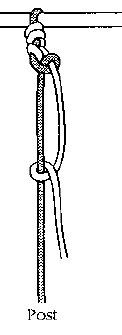
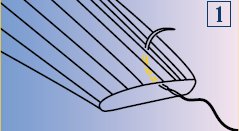
The Revo knot is a non sliding knot consisting of multiple half hitches made by alternating the post and direction of half hitches.
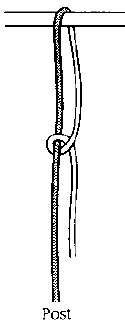 |
Underhand knot is thrown around the post and with the knot pusher on the post strand, the half-hitch is pushed down the post with alternating tension on each strand until the half-hitch is tightened on the tissue.
|
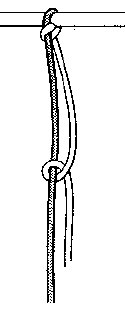 |
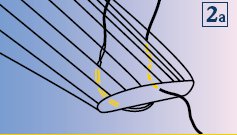
Back off the knot pusher while still holding tension on the post strand and throw another underhand half-hitch and similarly push it into the joint until the knot is seated.
|
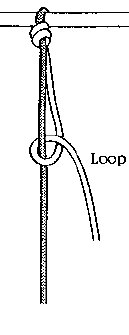 |
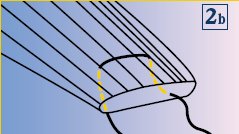
Again, maintaining tension on the post strand, an overhand half hitch is thrown around the post and “walked” down into place.
|
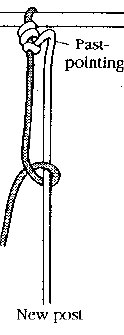 |
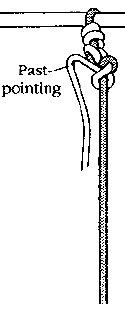
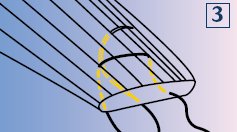
This knot is then further tensioned by “past-pointing”, (relax the loop strand and push the knot pusher past the knot on the loop strand and then apply tension to both strands while holding the pusher past the knot. This further tensions the knot). The knot pusher is then switched to the other suture limb, i.e. the “new” post and an underhand half hitch is placed and tensioned.
|
  |
The post is again changed and an overhand half hitch is placed and walked down the post and tensioned again by “past-pointing”. The tails of the suture are then cut 3-4mm from the knot.
|
|
|
Alternatively, the half hitches may be “pulled” into the joint by placing the knot pusher on the loop strand “ahead” of the loop to drag it down the post. This allows you to tighten the knot in the joint by “past-pointing”. The above steps are repeated, but by “pulling” instead of pushing. ( This is somewhat easier and smoother than “pushing” the knots down and can help “protect” the suture from breakage if it has become frayed).
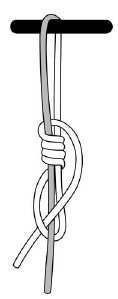
Square knot
Square knots are difficult to tie
arthroscopically. If tension is applied asymmetrically to the limbs the knot
converts to two non-identical half hitches, and once the knot seats it is very
difficult to tension. However, this made easier by using mechanical spreader types of knot pusher/tiers.
Place an overhand loop around the post strand and place a single hole knot
pusher on the loop limb and pull the loop limb into the joint by passing the
knot pusher beyond the loop, holding it in that location and applying tension on
the free end of the loop strand to pull the first loop into position. Snug it
down by keeping the knot pusher beyond the knot on one side and apply tension on
the post limb. Inspect the knot to confirm that it is not a half hitch, and if
desired the knot may be clamped from an alternative portal to maintain tension.
Back the knot pusher up the loop suture and pass an underhand loop around the
same post and advance it into the joint as above using the knot pusher still on
the loop suture. Seat the knot by moving the knot pusher to the post suture and
passing it beyond the knot again applying tension to tighten and secure.
Additional loops can be applied if needed.
Sliding knots
When tying a sliding knot, make the post strand as short as possible and the loop strand as long as possible. (As the knot slides down the post entering the joint, you end up with two fairly even suture limbs.)
Place the knot pusher and mosquito clip on the post strand. The sliding knot is tied around the post strand, tightened, and pushed down into the joint.
Modified Duncan loop - (non locking)
Modified hangman's loop - (non locking)
Nicky's knot
Field knot
Giant knot
SMC knot
Roeder knot
Weston knot
Taut-line hitch
Buntline hitch
Tennessee slider
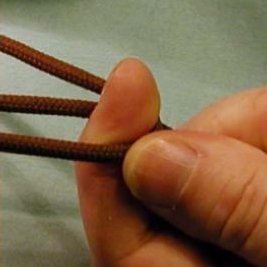
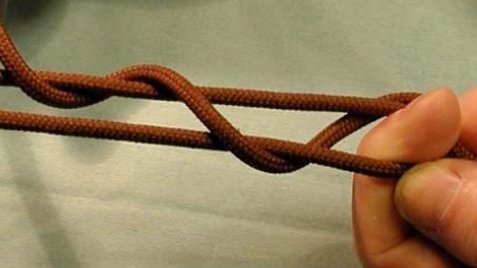
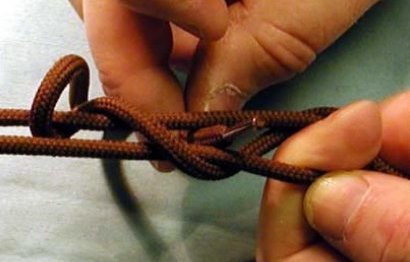
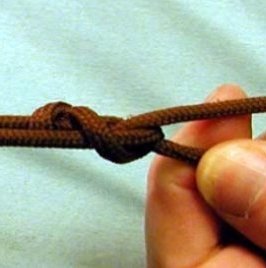
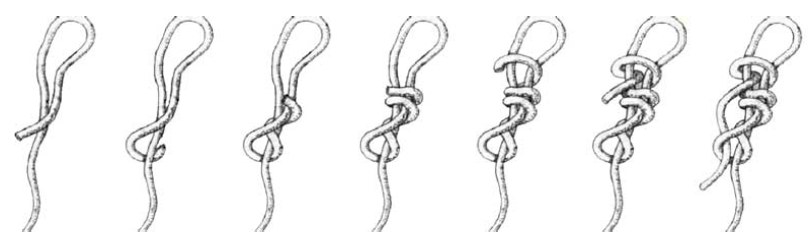
Duncan Loop, Hangmans or Fishermans knot
Several variations exist
 |
 |
 |
|
 |
|||
Nicky's knot
SMC knot
 |
|
 |
|
 |
|
 |
|
 |
|
 |
|
 |
|
 |
|
 |
|
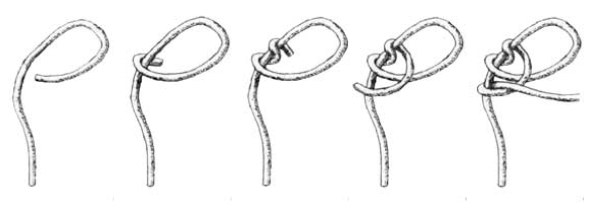
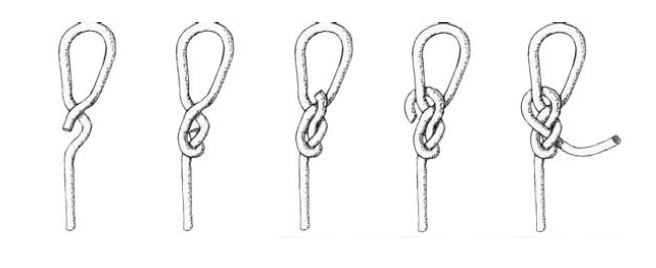
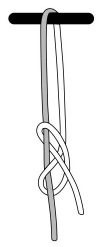
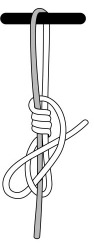
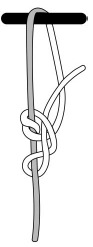
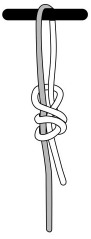
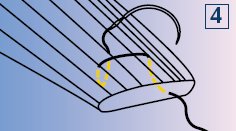
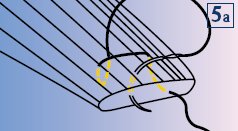
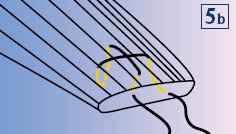
Roeder knot
Begin with two uneven, parallel limbs. Throw the first
loop around the post strand only, the second loop around both limbs, and the
third loop only around the post strand, passing the tail of the loop limb
between the two parallel strands, between the second and third loops. The knot
is again seated and tensioned and pushed into the joint. This is again secured
with a series of half hitches alternating direction of throws and utilizing post
switching.
Modified Roeder Knot:
The Roeder knot has been modified in several ways. One way is to add an extra
loop around both sutures and again passing the tail between the parallel
strands, between the third and fourth strands.
The Lieurance modification is to tie the standard Roeder knot, but after passing
the tail between the second and third loops, the tail is then brought back up
and through the initial loop and pulled into the joint without pre-tensioning
the knot. This provides a “self-locking” knot which is secured with alternating
half hitches.
Lieurance-Modified Roeder Knot:
Begin with two uneven, parallel limbs. The short is the “post” and the longer
limb is the “loop strand”. Throw the first loop around the post strand only, the
second loop around both limbs, and the third loop only around the post strand,
passing the tail of the loop limb between the two parallel strands, between the
second and third loops. The tail is then brought back up and down through the
initial loop. This is then “loosely” tightened, making sure not to pull on the
“loop strand” as this will “lock” the knot. This is then pulled into the joint
without pre-tensioning the knot. The knot pusher is pushed down on the “post”
strand. The “post” strand is then pulled on while pushing down on the knot. With
the knot pusher firmly against the knot, the “loop” strand is then pulled,
locking the knot. This provides a “self-locking” knot, which does not “back-up”
when tension is relaxed on the post. This is then secured with alternating half
hitches.
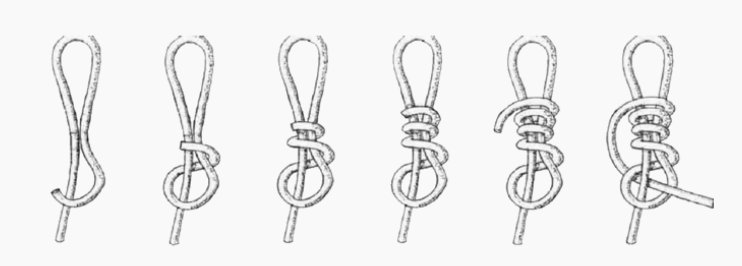
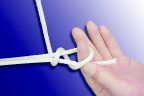
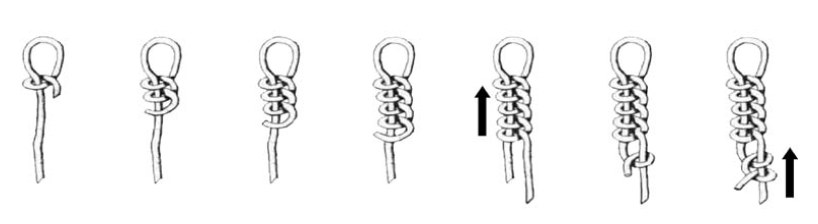
Buntline hitch
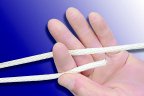 |
Pull suture ends to form a short post and a long leg. Hold the short strand between your thumb and index finger. |
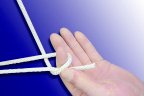 |
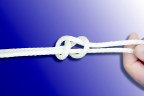
Loop the long leg around your index finger and under both suture limbs. |
 |
Loop the long limb around and under both limbs a second time. |
 |
Pass the long limb through the first loop made by your index finger. |
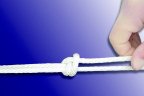 |
Tighten both limbs of the suture. The short limb will become longer than the original long limb. |
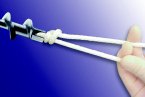 |
Switch posts, loop a surgeon’s double half-hitch behind the knot. |
 |
Slide the surgeon’s half-hitch to the buntline hitch knot. |
 |
Secure the knot by pulling on the shortest limb. |
Dines knot
Lafosse Knot
Modified taught line hitch
Tenesee slider
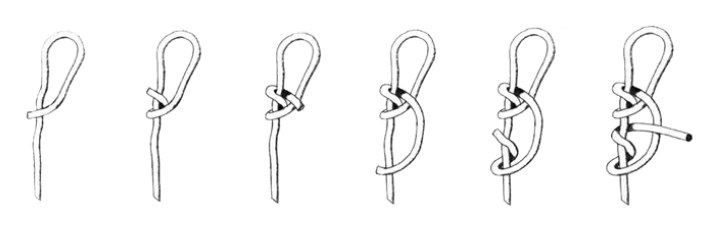
The Tennessee slider is essentially another modification of the Roeder knot. To
tie the Tennessee slider, the sutures are again made uneven and parallel. The
loop strand is thrown around both the post and loop strand one time and then
around the post strand only and is brought up between the parallel limbs between
the first and second loops. This is tensioned and pushed into the joint and
again backed up by a series of four alternating half hitches with post
switching.
French knot
Tarbuck knot
Scaffold knot
Modified Mason allen
 |
The entrance stitch is begun from the edge of the tendon exiting on its superior surface. |
 |
A
throw is then made horizontally from the superior to the inferior surface of
the tissue. |
 |
|
 |
The needle is then passed from the inferior to superior surface of the tissue medial to the horizontal stitch. |
 |
The suture is finally passed over the top of the horizontal throw, creating a cruciate configuration. |
 |
This final manoeuvre serves to lock the suture within the tendon, creating superior pull-out strength. |
 |
References
Arthroscopic Knot Tying; Seung-Ho Kim, MD, PhD; Jae Chul Yoo, MD; Techniques in Shoulder & Elbow Surgery 4(2):35–43, 2003
Failure characteristics of various arthroscopically tied knots; RK Lieurance, Daniel S. Pflaster, Douglas Abbott, Wesley M. Nottage; Clin orth and related research; 408:311–318, 2003
Page created by: Lee Van Rensburg
Last updated: 11/09/2015